Thursday, April 26, 2012

Purple, purple, purple.... & Chocolate Cupcakes w/ Strawberry butter cream frosting

Well, another birthday has been added to the books. My wonderful family, boyfriend, and friends threw me a surprise, purple themed birthday party at Wowzone. Pizza, bowling, and of course DQ cake. Going w/ the purple theme, I received a beautiful kitchen aid mixer..in which color?!


PURPLE! My favorite! My dad and I gave one of these to my mom when I was little, and I have always loved it! My sister, the amazing party planner, and my niece also gave me a ginormous box of every possible color of cupcake wrappers. They are so pretty - it is almost to hard to use them.

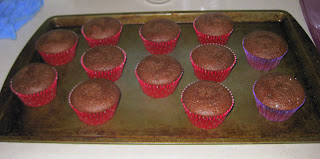
Of course, I had to try it out right away the next day. Having limited groceries in the house, I made a box of chocolate cake mix. Something easy for the first time! I also chose pink and purple polka dots for the wrappers!


I decided to make a butter cream frosting with the ingredients we had at the house.

2 sticks salted butter, at room temp
4 cups powdered sugar
3-4 tbsp skim milk
dash of vanilla
strawberry jello mix

Beat butter in your stand up mixer with the whisk attachment for about one minute. Add half of the powdered sugar, blend til combined. Add half of the milk and blend again. Repeat with the second half of ingredients. I learned a little trick from a good friend about coloring and flavoring frosting with a bit of jello mix for a quick option. I poured in a bit of jello mix, blended for a bit, and added a bit more until it was the flavor and consistency I wanted. This frosting has a bit of a "crunch" to it. I chose to use a 1M star tip to frost my cupcakes.


The pointy cupcakes were frosted from outside in, while the rose pattern is from inside out.


I brought these along for a picnic lunch we went to with my sister and niece today at Sibley Park. They were delicious! I can't wait to keep baking more goodies!

Friday, April 20, 2012

Lemon-Berry Shortcake Cake

Lemon is definitely favored among a few of my family members. I learned to make my dad a lemon meringue pie at age 3. Figures that my boyfriend is also a lemon freak. I found this delicious looking recipe and thought to give it a try and face the taste test of my family.

To make the cake:

1 1/2  cups all-purpose flour
3 tbsp cornstarch
1 tsp baking soda
1/2 tsp salt
1 stick (1/2 cup) butter, at room temp
1 1/2 cups granulated sugar
1 tbsp lemon zest
1 tsp vanilla
3 eggs, at room temp
1/2 cup light sour cream, at room temp

Sift together the first four ingredients in a medium bowl. In a mixing bowl, beat butter, sugar, lemon zest, and vanilla on medium speed until light and fluffy. Add eggs one at a time and beat thoroughly after each.  Add sour cream and blend until smooth. Divide batter between two greased and floured 8 inch round pans. Bake at 350 for 25 minutes, or until golden brown. Let cool for 10 minutes, then flip upside down on parchment paper or a drying rack. (I have very limited kitchen supplies and put mine on cutting boards. In the future, I would put some parchment down prior to doing this because the bottom layer stuck to the cutting board.)


To prepare the berries:
Thaw 16 ounces of fresh or frozen mixed berries (I used strawberries, blueberries, and blackberries) with 3 tsp of sugar. Mix well. After at least 10 minutes, smash the berries using a fork to release some juices. If frozen, there will be a lot of juice.


To make the frosting blend the following until smooth (add enough milk for a creamy spreadable texture):
8 ounces of cream cheese, at room temp
1 stick (1/2 cup) butter, at room temp
2 1/2 cups confectioners sugar
2 tbsp lemon juice
1 tsp vanilla
splash of milk

To assemble the cake, place one of the cakes on your serving plate. I suggest doing this fairly close to serving time. Using a slatted spoon, spread half of berries on cake. Drizzle on some juice, using discretion as to not make cake soggy. Spread half of frosting on top of berries. Repeat using the second cake and the rest of the berries and frosting. Dig in and ENJOY!


Best eaten right away, it gets soggier the longer it sits. Store in the fridge!


The next time I make this, I'll probably frost the top of the first cake with a little frosting and then add the berries on top. I would frost the bottom of the top cake and squish together. I had some problems with my layers coming apart; I think frosting will glue it all together a bit more! I also didn't quite use all of my frosting.

Friday, April 6, 2012

Easter Egg Cake Pops

Okay, so it's been almost 2 months since my last post. It's been a busy, working-everyday sort of time. I've tried cake pops a few times before and I know my cousin Karie loves them! I decided to venture on and try a new version of the recipe..Easter Eggs. On a stick this time too!

Everything starts the same for cake pops.

Bake a cake of your flavor choice, a box is just fine. Everything gets mashed together so I don't see the point in making a homemade one. Maybe someday I'll master my own confetti cake mix. After the cake has cooled, crumb it with a fork. I decided to leave the very edges of my cake out of the mix, as they were pretty browned and gross. Mix in 3/4 of a can of frosting. Yup, not homemade either and any flavor you want. I chose a vanilla frosting to go with the confetti cake. Then, freeze this concoction as it definitely helps in the next few steps.


Get a cookie sheeet ready with some wax paper and then shape the mix into egg shaped "balls". Mine were about the width of a quarter. My one box of cake made 40 eggs.


Melt a package of vanilla candy coating (in the past I have used almond fudge, but I like this better) in the microwave. Pour into a mug or tall cup, wide enough to fit the egg with some space. Dip the ends of the sticks into the candy and insert halfway into the egg. (I used wood skewers but after I bought these I saw lollipop sticks that would have been cuter.) Place carefully on wax paper pan and freeze when all eggs have their sticks.

I found out the second time around that the longer they sit in the freezer, the easier it is to candy coat them. But after at least 20 minutes, take out the pan. Give the candy coating another 30 second zap in the microwave and a good stir. Then carefully dip egg into candy coating. Rotate and GENTLY tap the stick on the cup to get the excess coating off of the egg. Place into styrofoam to drip dry. Some of mine still dripped quite a bit of coating down the stick, but after it dries you can break it off.

When the coating is dry and hard you can decorate! I used all kinds of sprinkles and colored sugars. Use a paint brush dipped in light corn syrup to act as "glue" for your "glitter"


 I plan on bringing these with me to my parents for our Easter brunch on Sunday. I created a cute little pan, verses using boring Styrofoam. Now being as broke as I am, I cheaped out and bought the stuff you use when making wedding bouquets and arrangements. It turned out to work pretty well, as it's green and kind of resembles grass. I also bought some cheap Easter "grass". I used my leftover frosting (the last quarter of the jar) to glue three sections of this flower stuff to the bottom of my pan. I then spread a very thin layer on top to act as a glue for the Easter grass.


Then I placed all the eggs in the grass and there you have it.